3 ways to get an instrument panel on a second monitor in MSFS 2024
A spare monitor next to your main screen is one of the best upgrades you can make to a home cockpit in Microsoft Flight Simulator 2024. It gives you an instrument panel that is always visible and that you can actually interact with. The hard part is not the monitor, but getting the instruments onto it.
There are three broad ways to do it. They differ in how much of your flying time goes into setup, and — more importantly than most write-ups admit — in how much of a panel they can put on screen at all. This article walks through all three. If you only want the conclusion, skip to which one you should use.
Option 1: the sim's built-in pop-out windows
MSFS 2024 can detach parts of the cockpit into their own floating windows, which you can then drag onto a second monitor. It's built in, it costs nothing, and for a single aircraft you fly regularly it's a perfectly reasonable answer.
The workflow is roughly: pop the instrument or display you want out of the cockpit, drag the new window across to your second screen, resize it to taste, and hide its border so you're not looking at a title bar mid-approach.
What's usually left out of the how-to guides is that this only works for glass. The pop-out mechanism detaches the sim's rendered displays — a G1000 PFD, an MFD, a GNS 530 — and that is the whole of what it can do. Analog instruments cannot be popped out at all. If you fly a Cessna 152, a Cub or a DC-3, there is no window to detach: the six-pack is painted into the cockpit model, and no amount of dragging will get an airspeed indicator onto your second screen. For a large part of the GA hangar, option 1 simply isn't available.
Even where it does work, what you get is the glass and nothing else. The bezel doesn't come with it — no knobs, no softkeys, no buttons. You end up with a display on your second monitor that you still have to reach back into the cockpit view to operate, which undoes much of the reason for putting it there. Tuning a radio or changing a course means going back to the main screen anyway.
And then there's persistence: you have to pop out the instruments every single flight. In fairness, though, this is the one limitation of the three you can lift easily — an open source pop-out manager such as MSFS Pop-Out Panel Manager will pop out and reposition each glass panel for you.
Takeaway: option 1 is the sim's own pop-out mechanism — free and already installed, but glass only: no six-pack, no buttons, no knobs. You still have to operate it from the cockpit view.
Option 2: a panel manager plus a pop-out manager
An answer to the limitations above is a pair of tools that between them cover both halves of the problem. A panel manager such as Air Manager replicates the panel itself: the steam gauges, and the bezels around the glass with their buttons and knobs. An open source pop-out manager handles the other half, recording where the sim's glass windows should go and replaying that arrangement so you're not dragging a PFD into place every session.
Together they lift both of the limits from option 1. This is a real solution, however you must:
- Manually align the sim's pop-out inside the bezel. This is trickier than it sounds. The panel manager draws you a bezel with a hole in it where the glass belongs, but nothing puts the glass in the hole for you: you drag the sim's pop-out window over it and size it by hand until the two line up. Borderless, at the right size, in the right position, on the right monitor. The pop-out manager's job only begins once you've got it right — it remembers the position you arrived at, it doesn't find it for you.
- Repeat for every aircraft you intend to fly. None of it transfers. A 172's panel tells you nothing about the King Air's, or even about the 208's. So this isn't a one-off cost you pay to get set up, it's a cost per aircraft: ten planes in the hangar means ten panels to find and configure, and ten alignments — times the number of screens — to do by hand.
If you fly a lot of different aircraft, that per-aircraft setup cost is the thing that quietly decides what you fly. It's easier to stay in the plane whose panel is already configured than to spend an evening sourcing and aligning one for the plane you actually fancied.
Takeaway: option 2 is a paid panel manager plus a free pop-out manager. Between them they can put any panel on the screen, laid out exactly how you want it. You pay for the panel manager, and for hours of configuration per aircraft — worth it if that control is what you're after, very expensive in terms of money and time if it isn't.
Option 3: automatic panels
The third approach is to skip the layout step entirely: have software detect the aircraft, work out what its panel should look like, and draw it. This is what we built PanelSight to do.
In practice that means you connect a monitor, start PanelSight alongside the sim, and load a flight. The screen fills edge-to-edge with the panel for whatever you're flying, framed in a drawn bezel. There are no pop-outs to position and no layouts to build. Change aircraft mid-session and the panel rebuilds itself for the new one.
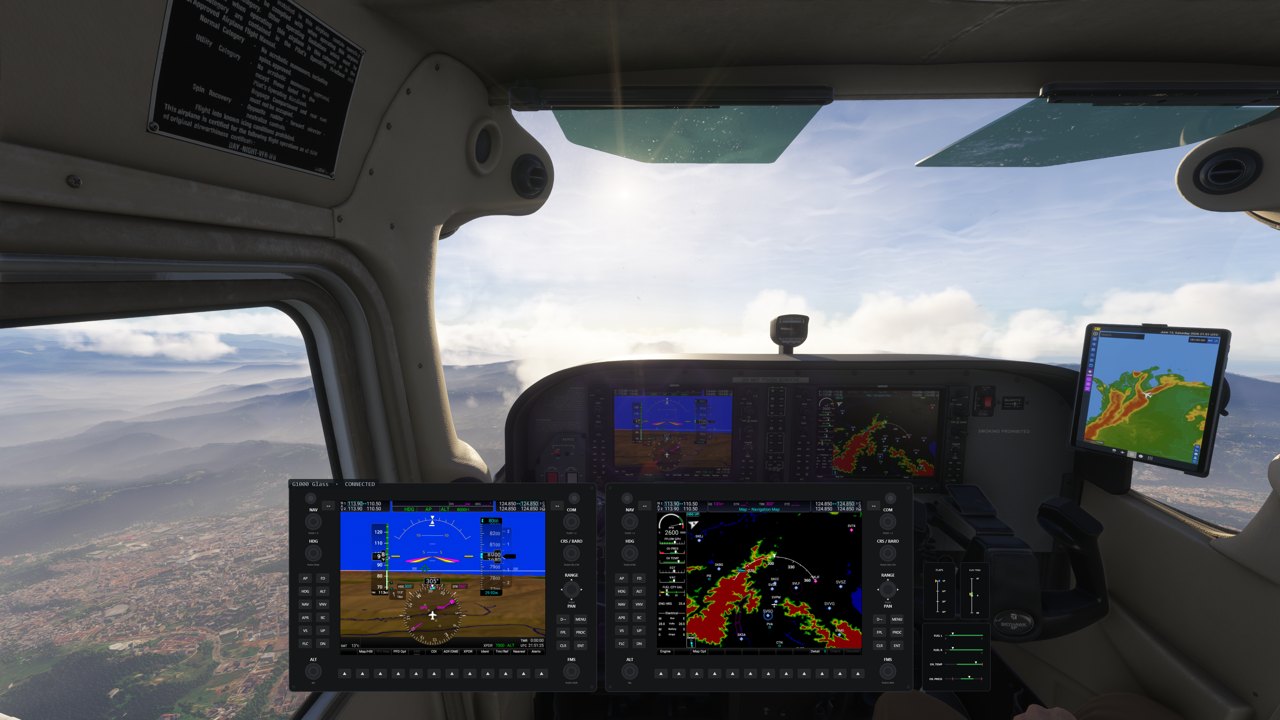
Both halves of option 2's job happen on their own, in one program. For glass aircraft PanelSight uses the sim's pop-out displays — but it positions them for you, and mounts them in a drawn bezel carrying the knobs and softkeys a bare pop-out window leaves behind, so the display is operable where it sits. For steam-gauge aircraft, where there is nothing to pop out, it draws the instruments instead: modelled on the real panel, with correct scales, coloured arcs and redlines, moving live with the sim. The difference from option 2 isn't what ends up on the monitor, it's that you didn't spend an evening per aircraft putting it there.
What about the knobs?
A panel you can only look at is half a panel — that's the flaw in a bare pop-out window, and it would be a poor showing to repeat it. The bezel's controls work: on a touchscreen you turn the knobs with a finger, press the buttons and scroll the maps directly; with a mouse you hover and use the wheel. The rotation area around each knob is deliberately generous, so you aren't hunting for the exact pixel edge of a bezel while hand-flying. No add-on hardware is required for any of it.
Takeaway: option 3 is PanelSight, which detects the aircraft and builds the panel itself. Any supported aircraft, glass or analog, with the controls where the panel is and nothing to set up per plane. It's a paid product, and you're limited to the aircraft that are supported.
Which one should you use?
For most people this is a choice between option 1, which comes for free, and option 3, which is a vast improvement at a reasonable cost and requires very little configuration time. Option 2 is more expensive and very time consuming.
Option 1 costs nothing and is already installed. It only works for glass, the displays arrive without their bezels — so no knobs and no buttons — and steam gauges aren't supported at all. If you fly glass aircraft almost exclusively and you don't mind reaching back into the cockpit view to work the knobs, it will do the job.
Option 2 is for you if you're willing to spend significantly more money than option 3, and hours fine-tuning how the panel of each plane looks. If you're building a home cockpit, fitting panels to a physical frame, or you simply want the layout to be yours, that isn't a cost you're grudgingly paying — it's the thing you came for, and no automatic panel can hand you that control, by definition.
If that trade doesn't appeal, option 2 is an awkward middle. It's the most expensive of the three — the panel manager is a purchase, the setup is the longest by some distance, and although the panel manager does replicate the bezel's knobs, working them with a mouse is enough of a chore that a hardware knob panel starts to look like a requirement rather than a luxury. It asks for more money and more evenings than either neighbour, to land in much the same place an automatic panel starts from.
Option 3 is PanelSight. It detects the aircraft you loaded, pops out the sim's glass displays and positions them itself, mounts them in bezels whose knobs and buttons work, and draws the steam gauges on the aircraft that have them. There's nothing to lay out and nothing to align: you connect a monitor, start it alongside the sim, and the panel is already there for any aircraft it supports. It's the answer once the built-in pop-outs stop being enough.
The case for an automatic panel is partly variety. If your flying looks like a 152 one evening, a DC-3 the next and a TBM at the weekend, per-aircraft setup is the tax that decides what you load. But it's also that it costs less than the panel manager option 2 is built around, and that the hours which would go into micromanaging layouts and aligning pop-out windows don't get spent at all. For most people it arrives at the same panel they were trying to build under option 2 in the first place. Only if you're particular about that layout does option 2 give you something this can't.
You don't need a second monitor to start
If you only have one screen, the same panels can pin over the sim view as an overlay: fly external, zoom out, and the instruments stay readable. Double-tap Ctrl to hide or show it. It's a good way to see whether the idea suits you before buying a monitor for it.
Try it on your own hangar
PanelSight supports 28 MSFS 2024 aircraft today, from the Cessna 152 and the DC-3 up through the TBM 930, PC-12 and King Air 350i. The free 7-day trial includes every aircraft and feature, and needs no payment details. The Cessna 172 overlay is free forever.
Download the free trial